How to debug your JavaScript code
The amount of JavaScript code in your web pages can grow significantly over time, especially if you use AJAX (Asynchronous JavaScript And XML) to design web applications. To quickly find and eradicate logical errors in your code, having a top-of-the-range JavaScript debugger is a must.
Syntax Check in JavaScript Editor lets you get rid of syntax errors instantly: it finds them, highlights them and explains them for a speedy correction.
Logical errors are more elusive. To find them, you have to set breakpoints and watch lists and closely examine the state of your variables as the program executes.
By comparing the expected state against the actual state of variables you will be able to pinpoint the errors in the program logic and correct them. |
Developers looking for a free JavaScript debugger have two options: Microsoft Script Debugger (for IE), or Venkman (for Mozilla-based browsers).
Alas, using them is nowhere as easy as using the powerful debugger built into JavaScript Editor. A free JavaScript debugging utility needs many steps to achieve what Editor's JavaScript debugger does in a single click. And the Editor's tools that make inspecting variables a breeze are simply not there in free JavaScript debuggers.
This tutorial guides you step-by-step through using the JavaScript debugger. To assist you in becoming an expert in debugging JavaScript code, the tutorial is hands-on: the  mark indicates a step to perform; the mark indicates a step to perform; the  bullet point provides further explanations. bullet point provides further explanations.
After going through the tutorial, you'll be debugging web applications with ease and in no time.
How to setup breakpoints for debugging your JavaScript code
Breakpoints allow you to stop the execution of the script at the location in the source code that you nominate. When the breakpoint is reached, you can observe the value of the variables you are using.
Note: Old versions of Antechinus® JavaScript Editor do not include the script debugger. If you have not already done so, click here to download and install the latest version, with the number-one, professional JavaScript debugger.
Important: Depending on your system configuration, you might have to change your settings. Click here for the instructions on how to enable JavaScript debugging. |
Launch your JavaScript Editor and open the JavaScript_Debugger_Tutorial_1.htm file. You will find it in the Tutorial folder inside your JavaScript Editor folder.
The page calculates the multiple of two numbers you specify. The code is intentionally simple, but the principles for debugging it apply equally to the code of any complexity.
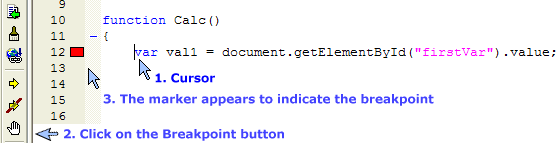
Take a moment to familiarize yourself with the code. Position the blinking cursor on the line 12 and click on the  Breakpoint button on the toolbar to set the breakpoint. Breakpoint button on the toolbar to set the breakpoint.
Click on the  Start Debugging button. This opens your page in the browser and starts the debugging session. Start Debugging button. This opens your page in the browser and starts the debugging session.
Tip: If you are using 2 monitors, leave JavaScript Editor on the first monitor and drag the application you are debugging on the second monitor. |
In the browser window, click on the Calculate button. JavaScript Editor springs into view and the breakpoint on line 12 has been reached (but not yet executed), which is indicated by the yellow arrow:

In the next part of the tutorial you will examine what each variable in your code is holding.
How to view local variables in the JavaScript code you are debugging
When the execution is stopped, you can view your variables.
Click on the  View Local Variables button. This brings the window where all your local variables are listed. Since the execution has been stopped inside the Calc() function, the window shows all the local variables Calc() defines: val1, val2 and val3. View Local Variables button. This brings the window where all your local variables are listed. Since the execution has been stopped inside the Calc() function, the window shows all the local variables Calc() defines: val1, val2 and val3.
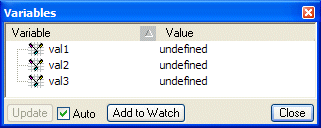
Since the lines 12, 13 and 14 have not been executed yet, val1, val2 and val3 are undefined.

Click on the  Step Over button. The line 12 has now been executed and the execution is now stopped at line 13. Note that val1 is no longer undefined: the program automatically updates its value inside the Variables window. Step Over button. The line 12 has now been executed and the execution is now stopped at line 13. Note that val1 is no longer undefined: the program automatically updates its value inside the Variables window.
Tip: Resize the Variables window to the size that suits you best: it remembers its size and position. |
Tip: Your JavaScript code can potentially contain huge numbers of local variables, and updating all of their values automatically can be time-consuming. In this case, un-check the Auto button and update the variables when needed by clicking the Update button. |
Click the Step Over button once more. The break line indicator is now on line 14, and val3 is the only variable still undefined.
Click the  Step Into button. The execution steps into the MultTwo() function. Since this function is located in the different file (MultTwo.js), JavaScript Editor opens it and places the break line indicator on line 5. Step Into button. The execution steps into the MultTwo() function. Since this function is located in the different file (MultTwo.js), JavaScript Editor opens it and places the break line indicator on line 5.
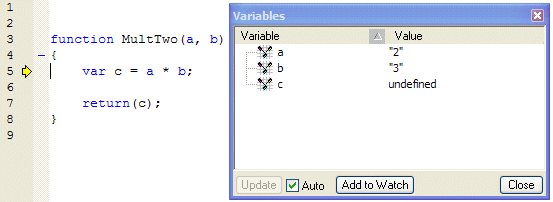
Notice that the Variables window is now showing the local variables inside the MultTwo() function. The c variable is undefined because the line 5 is yet to be executed.
The next part of the tutorial shows what stack frames are and how to use them to debug your code effectively.
How to view stack frames of the javascript code being debugged
There are instances when knowing only the values of your local variables is not enough. When the code enters a function, all local variables are allocated on the stack. A stack frame is formed. If the function calls another function, another stack frame is formed, for example:
a() calls b(), which calls c(), which calls d().
When the breakpoint is reached inside the d() function, JavaScript Editor allows you to see the call stack, or stack frames of all the functions in the chain.
Click on the  View Stack Frames button. View Stack Frames button.

The Stack Frames window displays the content of the current stack frame. The pull-down menu allows you to see the content of all the other frames.
In our tutorial, the code is stopped inside MultTwo() function, and three stack frames have been generated.
Use the pull-down menu to see the contents of the other two stack frames. Clicking on the Show me! button takes you to the exact location in the code where each stack frame has been entered.
Tip: Resize the Stack Frames window to the size that suits you best: it remembers its size and position. |
Examining the call stack gives you a detailed snapshot at a given point of execution. Compared to the Local Variables window, the Stack Frames window gives you a broader view of your application.
More JavaScript debugging commands:
Step Out, Step Over, Continue and Run to Cursor
Close the Stack Frames window and click on the  Step Out button. The execution will continue from the break location until it leaves the current context. In our example, we step out of the MultTwo() function and back into the Calc() function that invoked it. Step Out button. The execution will continue from the break location until it leaves the current context. In our example, we step out of the MultTwo() function and back into the Calc() function that invoked it.
Notice that the Local Variables window now displays the values of val1, val2 and val3 variables.
Click on the  Continue button. Unlike the Step Over, which stops the execution at the next line of code, the application continues to execute until the next breakpoint has been reached (if any). In this example, you only set one breakpoint (line 12 of the JavaScript_Debugger_Tutorial_1.htm file), so the control passes back to the browser. Continue button. Unlike the Step Over, which stops the execution at the next line of code, the application continues to execute until the next breakpoint has been reached (if any). In this example, you only set one breakpoint (line 12 of the JavaScript_Debugger_Tutorial_1.htm file), so the control passes back to the browser.
Inside the browser, click on the Calculate button again. The execution stops at the breakpoint on line 12:
Place the cursor on line 15, and click on the  Run to Cursor button. This command executes all the lines in between and stops the execution at the line with the cursor. Run to Cursor button. This command executes all the lines in between and stops the execution at the line with the cursor.
Tip: The Run to Cursor is most useful to get out of the loop, for example:
for(i=0; i<10000; i++)
{
...
}
Running this code line-by-line would waste lots of your time: there are 10,000 iterations to complete before the loop is exited. Instead, place the cursor on the next line of code after the loop and click the Run to Cursor button. |
Click on the Continue button.
Managing your breakpoints
Placing the cursor on the line of code and clicking the Breakpoint button allows you to toggle your breakpoints on and off.
There are cases when your page consists of thousands of lines of code and links to a number of .js files. Placing your breakpoints in many locations and/or in different files makes them more difficult to manage.
The Breakpoints window allows you to conveniently manage your breakpoints from one central location.
Select Build / Breakpoints from the menu
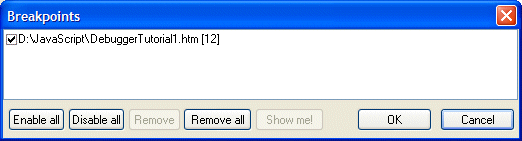
Enable all activates all of your breakpoints. Manually checking every breakpoint has the same effect.
Disable all keeps the breakpoints in place, but deactivates them. Enabled breakpoints show as full red blocks next to line numbers  . Disabled ones are hollow . Disabled ones are hollow  . .
Remove deletes the selected breakpoint.
Remove all deletes all the breakpoints.
Show me! displays the location in the code of the selected breakpoint. Having lots of breakpoints means that you can accidentally disable or remove the unintended ones. The Show me! command removes the guesswork - you see exactly the breakpoint being referred to.
Click on the Remove all button, and click on the OK button to close the window.
How to break the execution at the first available line of script
This is best explained by example. Let's say you want to debug the code that executes when you click a button on your web page.
Instead of chasing the correct location in the source code, you save lots of time by:
Selecting Build / Break from the menu, and
Clicking the button on your web page.
The execution will stop at the first line of code being executed, allowing you to set your breakpoints, view variables, etc.
Select Build / Break from the menu
Switch to the browser showing the JavaScript_Debugger_Tutorial_1.htm file and click on the Calculate button.
The execution stops on line 25, which contains the call to the Calc() function:

Click the Step Into button. The execution steps into the Calc() function.
Terminating your debugging session
Click the Continue button, and
Click the  Stop Debugging button. Stop Debugging button.
The debugging session is closed and JavaScript Editor automatically closes the browser with the JavaScript_Debugger_Tutorial_1.htm file. Points to remember:
Stop Debugging automatically closes the browser opened with the Start Debugging command. If you used Build / Connect Debugger from the menu to connect to the running instance of Internet Explorer, it will remain open.
If the application is stopped at a breakpoint, it will remain "frozen" and running after you click on Stop Debugging. This behavior is used for advanced debugging (explained in Part 2 of the tutorial), but if this is not what you want, click on the Continue button before clicking on Stop Debugging.
Closing the browser without clicking on the Stop Debugging also shuts down the debugging session. This is not as safe as using Stop Debugging. JavaScript Editor builds a 2-way communication with the application being debugged and maintains a number of internal tables when processing complex scripts. The proper debugger shut-down ensures that all internal structures are cleared:
- If the application is stopped, click Continue to un-block it, and
- Click on Stop Debugging to terminate the session and close the browser window.
Summary of JavaScript debugging commands
| |
Start Debugging (toolbar button). Opens the web page, connects the debugger and starts the debugging session. When shown next to the line number, the marker acts as the break line indicator. |
|
Stop Debugging. Terminates the debugging session. Closes down the browser opened with the Start Debugging button (unless the execution is stopped e.g. at a breakpoint). |
|
Breakpoint. Toggles the breakpoint on and off. |
|
Continue. Continues the execution from the break in the code. |
|
Step Into. Steps into the function / block of code. |
|
Step Over. Executes the current line of code and moves to the next one. |
|
Step Out. Steps out of the current function / context. |
|
Run to Cursor. Executes the code up to the cursor location. |

|
Inspect Variable. Shows the value of the selected variable. |
 |
Add to Watch. Adds the selected variable to the watch window. |
 |
Watch. Displays variables and their values and updates them automatically at each break of the execution. |
|
View Local Variables. Toggles the local variables window on and off. |
|
Stack Frames. Toggles the Stack Frames window on and off. |
Build / Break from the menu |
Directs the execution to stop at the first line of script. |
The second part of the tutorial guides you through the advanced JavaScript debugging. This know-how makes your web design reliable and safe.
Make sure you completely understand the concepts on this page before moving on.
Click here to commence the second part of the tutorial. |
